
Summary:
Some quick fixes can help most users to get rid of the Automatic Repair loop in Windows. You can download Bitwar Data Recovery software on your PC if you want to restore the data.


What is Windows Automatic Repair loop
Automatic Repair is a feature designed to help you fix some PC issues in Windows. But Windows Automatic Repair may fail to work and stuck in diagnosing your PC due to some reasons and go to a blue or black screen of death error.
Tip: If you have essential data on your PC, you'd better recover all the required data before fixing the "Preparing Automatic Repair" error on Windows 10.
Recover data from a computer that stuck on a black screen
To recover data on a computer with an error message "Preparing Automatic Repair," you need to remove the hard drive from the PC and connect it to another one. We recommend that you the Bitwar Data Recovery restore your data. It is an easy-to-use recovery software which supports recovering data due to sudden deletion, formatting, hard drive corruption, virus attack, system crash, etc.
Download and install Bitwar Data Recovery on your Windows 10/8, then follow the guides to recover data.
Step 1. Launch Bitwar Data Recovery software on your windows. Select the partition and click "Next."
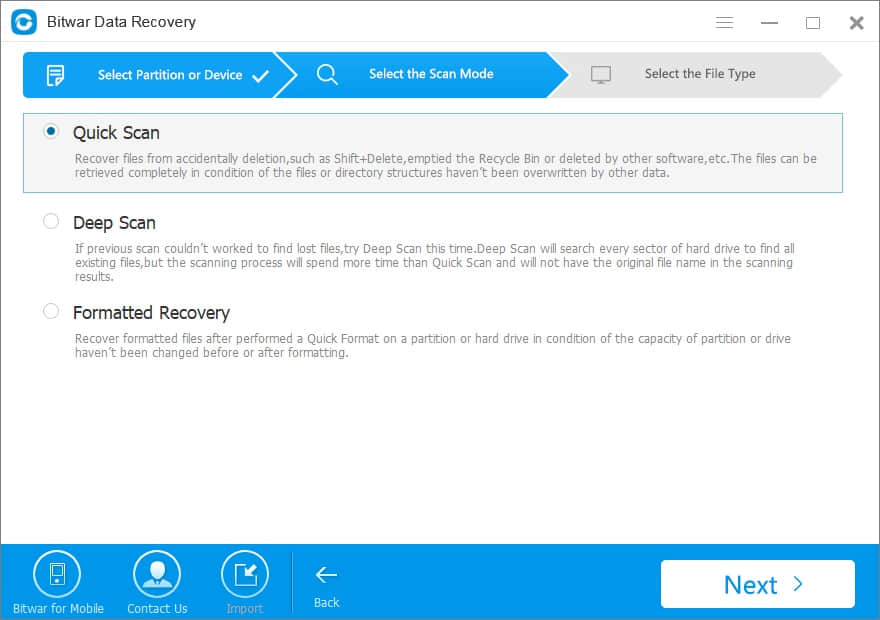
Step 2. You can choose the "Quick Scan" mode to recover lost files. If files haven't been overwritten, it can be fully recovered.
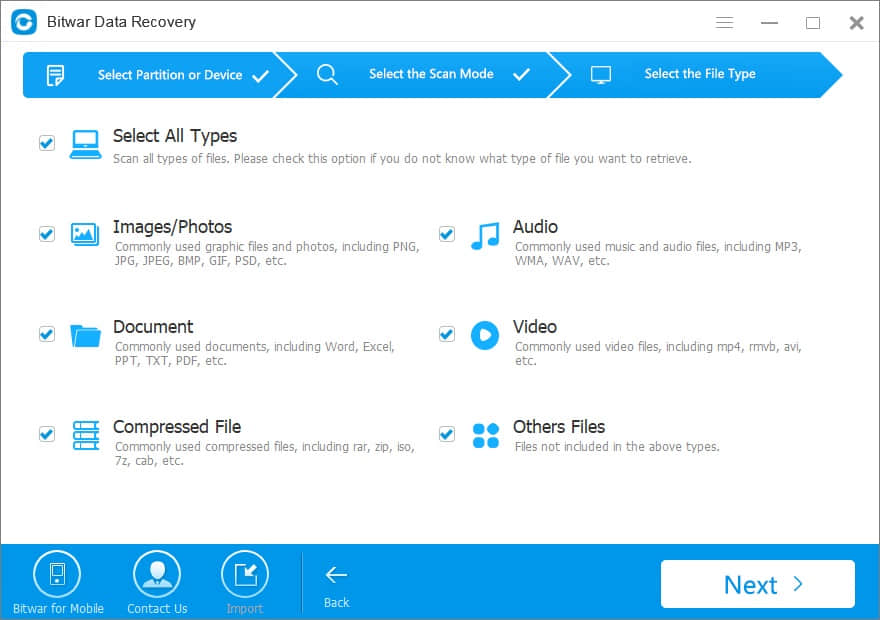
Step 3. Select the file types you want on this page and click "Next" to start scanning. You can also choose "Select All Types" button if you are not sure what kind of type the data is.
Step 4. After the scan, filter the files by file name, type, path, and time. You also can preview the data to check whether the file is intact. Then you can select the data you want and click the "Recover" button to save them in a normal partition or other external devices.

After following the above steps, the necessary files will be restored with the help of Bitwar Data Recovery. If you cannot find files with the "Quick Scan," you can try "Deep Scan" on step 2. The deep scan will search every sector of the drive to find all existing files. Whatever which mode you select, the files can be retrieved as long as the data has not been overwritten.
Now you can fix the error "Preparing Automatic Repair" on Windows 10 with the following solutions.
Methods to fix "Preparing Automatic Repair" loop on Windows 10
1. Refresh or Reset PC
You can refresh pc to fix windows 10 preparing automatic repair loop.
Shut down your windows forcefully. Then the system will enter the boot repair page after 2-3 times of reboot. Choose Troubleshoot, then go on to Refresh PC or Reset PC. Restart your PC and check if the issue has been resolved.
2. Disable early launch anti-malware protection
We recommend disabling early launch anti-malware protection. You can do it by using Command Prompt in Windows Boot Options menu which will appear after restarting the computer several times. Choose Troubleshoot > Advanced Options > Startup Settings. Your computer should now restart and give you a list of options, here choose "Disable early launch anti-malware protection."
3. Perform a startup repair
Some users recommend performing Startup Repair when the laptop is stuck on Preparing Automatic Repair during startup.
Insert the Windows bootable drive to your computer and boot from it. Select your language preferences and click on Next. Select Troubleshoot > Advanced Options > Startup Repair.
4. Manually repair MBR and rebuild the BCD
If the MBR and Boot Configuration Data (BCD) store are missing, corrupted, or not properly configured, Windows won't be able to start. So you can try to repair MBR manually and rebuild the BCD. To do it, choose to Troubleshoot > Advanced Options > Command Prompt. When Command Prompt appears, enter the following lines and press Enter:
bootrec.exe /rebuildbcd
bootrec.exe /fixmbr
bootrec.exe /fixboot
5. Restore or reset the system
If "Windows Automatic Repair" loop still exists, please try the last methods - performing a system restore. To do it, in Windows Boot Options menu, choose Troubleshoot > Advanced Options > System Restore. Follow the Wizard instruction and select the appropriate restore point. Finally, click Finish to restore the system.
6. Disable Automatic Repair at Windows 10 boot
During its startup, Windows 10 has also been known to get stuck in a Preparing Automatic Repair loop. Therefore, some users will try the following steps to let Windows do any Automatic Repairs.
a) Insert the Windows bootable drive to your PC and boot from it.
b) Select your language preferences, and click on Next.
c) Click on Repair your computer.
d) Click on Troubleshoot.
e) Click on Advanced Options.
f) Click on Command Prompt.
g) Type bcdedit /set {current} recovery enabled No in the Command Prompt window and press Enter button.

h) Type exit and press Enter.
Conclusion:
These are all the possible solutions that may help you to fix the "Automatic Repair" loop issue in Windows 10/8.1/8. If none of them works, you need to reinstall Windows. It is important to note that you should recover all your relevant data and files before you begin to reinstall Windows. Bitwar Data Recovery is the right choice!
This article is original, reproduce the article should indicate the source URL:
http://adminweb.bitwar.nethttps://www.bitwar.net/1448.html
Keywords:Fix Preparing Automatic Repair